
Location-based personalization is a powerful way for you to enhance your campaign performance. Our new Shakr Local Campaign Wizard empowers you to set up new Facebook campaigns with location-based targeting dynamically assigned for each localized creatives. Let’s get started!
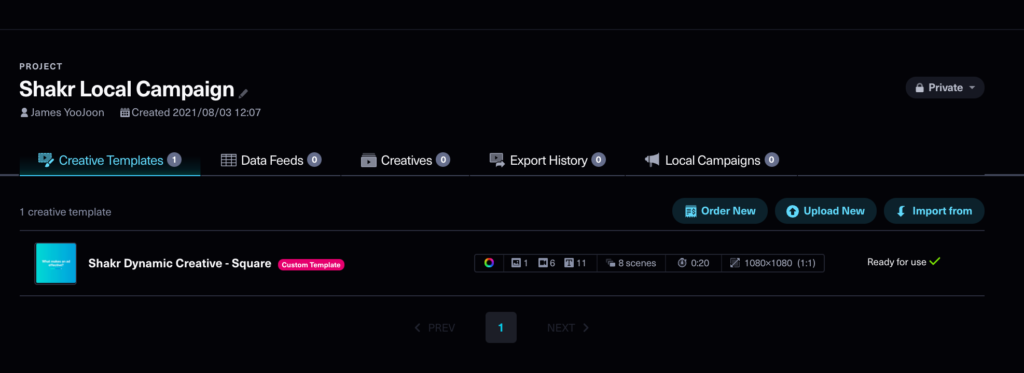
Let’s Add a Creative Template Beforehand
Add one of your custom creative templates to your project. You will need a template to be used for creating localized video ad creatives for your campaign. If you don’t have an existing template, please feel free to let your Shakr Representative know and we can help you upload (or create from scratch) a master creative template that’s optimized for localization
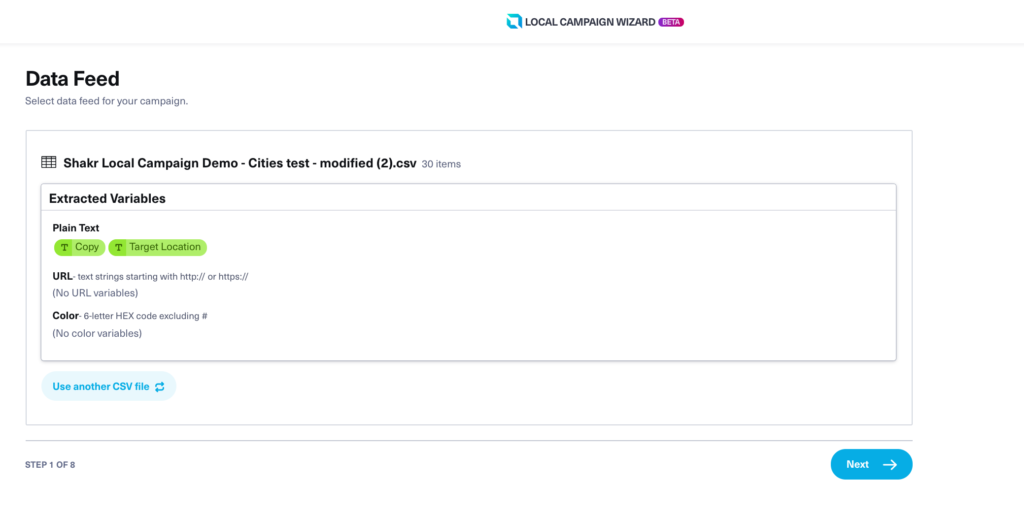
Step 1: Upload Data Feed
Upload a new data feed/select from an already uploaded data feed that corresponds to the chosen creative template. The data feed will be used to:
- Automatically creative localized videos by mapping the asset data (texts, images, videos, etc) to each editable aspects within the chosen creative template. Hence your data feed should contain information that will be contained in the final video creative.
- Automatically map locations for each localized creatives. Hence your data feed should contain target locations for each rows (which is equivalent to each video creatives).
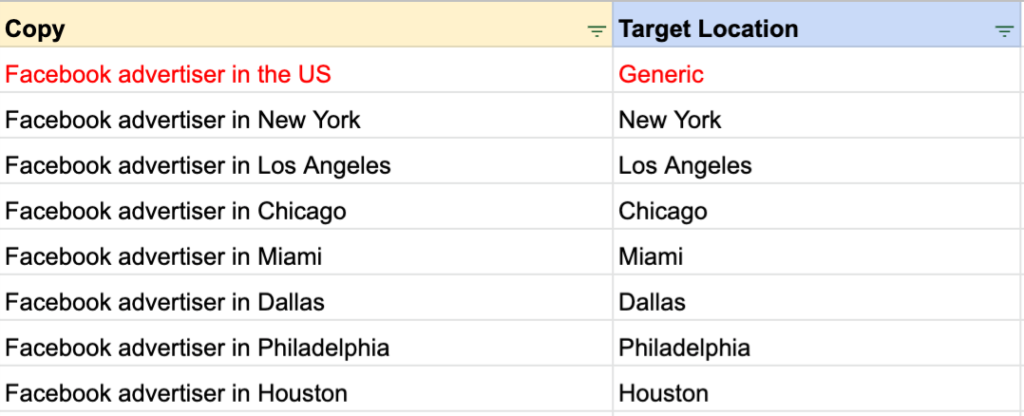
The screenshot below is a very basic example of what your data feed would contain. The names of each column can be anything – as long as you know which column has certain information needed for making videos, mapping locations, etc.
- [Copy] column contains text that will be included in the actual video creative.
- [Target Location] contains locations that each video ad creatives are to be targeted. The location can be names of Cities, Sub-cities, Regions, Countries or Zip-codes.
- [Generic] The campaign should include a ‘Generic’ creative. A ‘Generic’ creative is a creative to be shown when a mapped location(s) have too narrow audience or there is no match in the targeting location.
Example Data Feed Sheet
- To help you get started, You can copy the example data feed sheet (Click HERE to access). Feel free to ask us any questions about the planning sheet.
About Maximum Number of Locations
You can assign up to 199 different locations to each creative + 1 ‘Generic’ Creative to launch a campaign using the Shakr Local Campaign Wizard. This is equivalent to 200 rows in a data feed. Please click here to understand more about the number of locations that can be exported and how they will be divided per Ad Set – Ad in the exported Facebook campaign.
Grouping Multiple Locations in a single Localized Creative
The Shakr Local Campaign Wizard also supports assigning multiple locations for one video creative. In other words, instead of having a video creative being served for one location only, a video creative can be served to multiple locations for running hyper-localized campaigns on Facebook with the Shakr Dynamic Geo Ads solution.
How can this be done? In the data feed, if you include rows with the same contents but with different locations, then that video creative would include multiple locations served in the campaign.
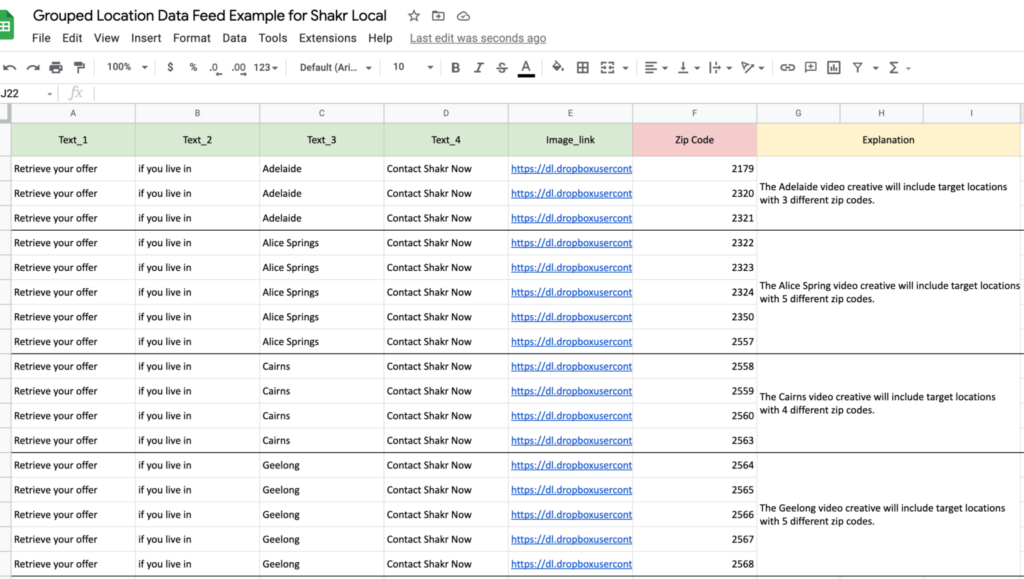
In the above data feed example, you can see that the variables Text_1, Text_2, Text_3, Text_4 and the Image_link are all filled with the same contents for each city. These are the variables contents are to be contained in the actual video creatives.
If the video creative’s variable contents are the same, then our system will treat this as one video creative. However, if the video creative has different target locations to be served (e.g. the Zip Code variable in the data feed), then those locations will be included under that video creative.
In this case, the Adelaide creative will have 3 different zip codes assigned, the Alice Spring creative will have 5 different zip codes assigned and served as the Shakr Dynamic Geo Ads campaign on Facebook and so forth.
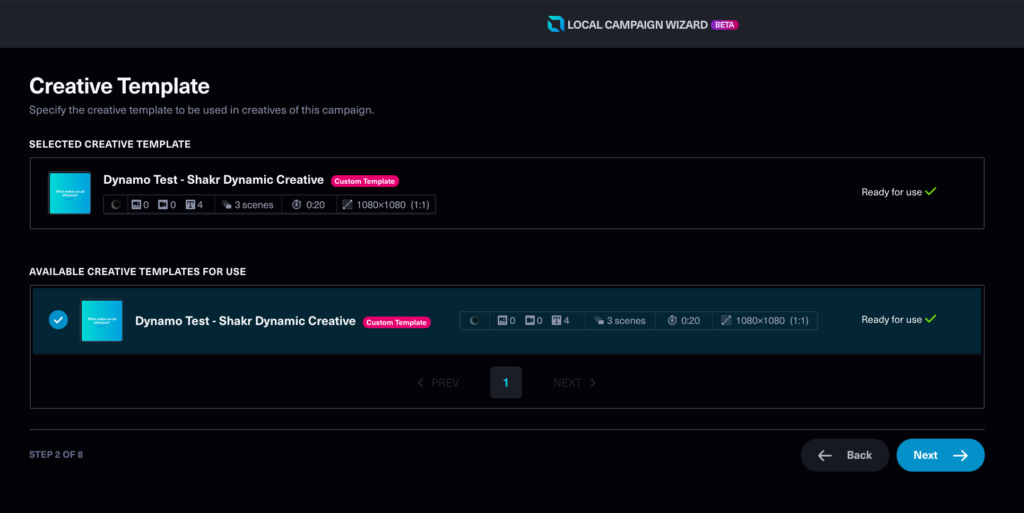
Step 2: Select Creative Template
Here, you will be able to see the list of creative templates that you have added to your project beforehand. Select a creative template to make video creatives – by mapping the information from the data feed you uploaded in the previous step.
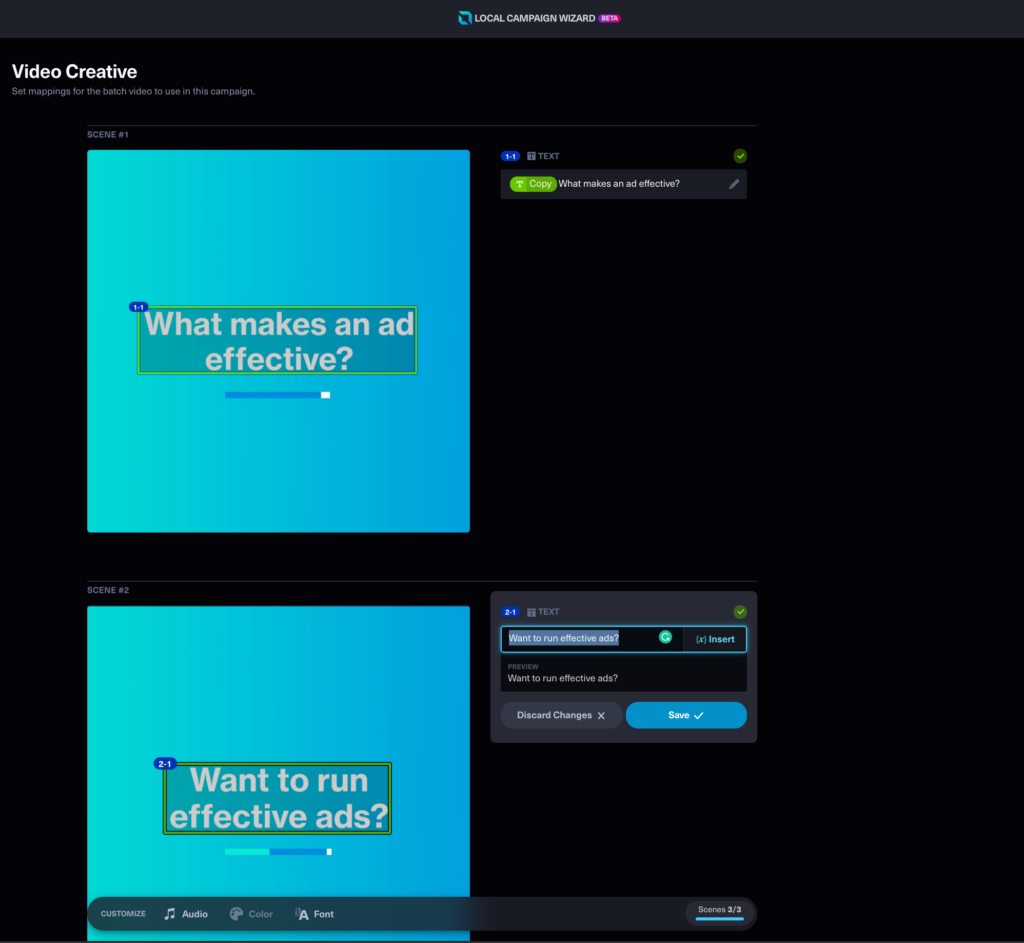
Step 3: Make Video Creatives
In this step, you will be using the Wizard’s video editor to create videos. The video editor will depict each scene of the selected creative template for you to make edits. Map each variable from the data feed to each editable aspect within the selected creative template. You can also assign static elements by not mapping variable(s) to desired editable parts within the template.
Step 4: Ad Accounts
Select a Facebook Business and its associated Facebook Ad Account that you want to publish the campaign to. If you don’t see the list of both, please connect your Facebook Account to the Shakr platform.
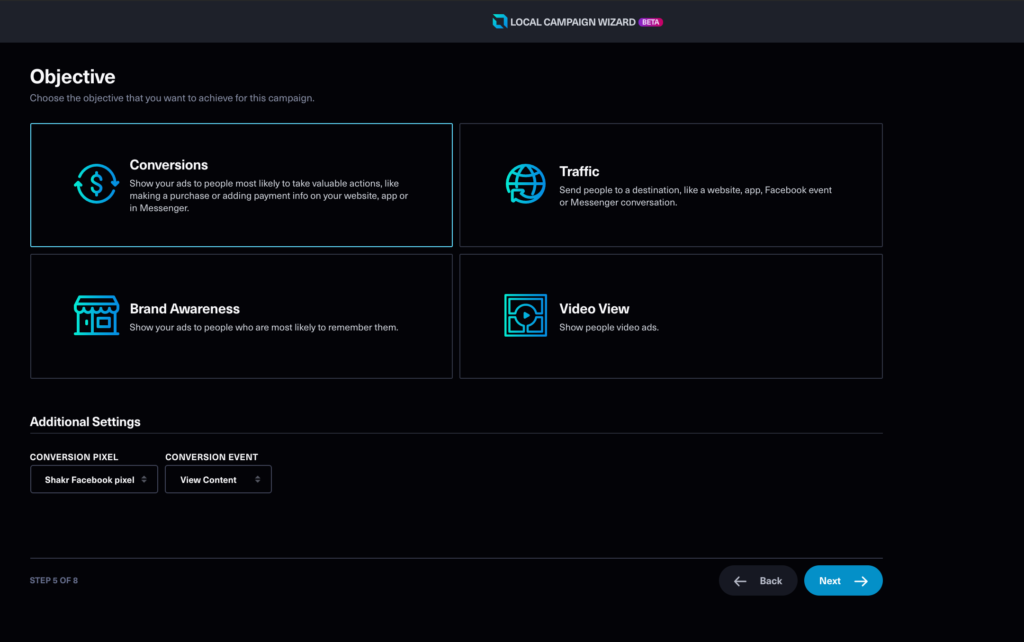
Step 5: Campaign Objectives
Select an objective for your campaign. Currently, we provide 4 types of campaign objectives that you can launch via Shakr Local Campaign Wizard.
- Conversions
- Traffic
- Brand Awareness
- Video View
Once you have selected an objective, please make sure to assign the ‘Conversion Pixel’ and ‘Conversion Event’ for your campaign.
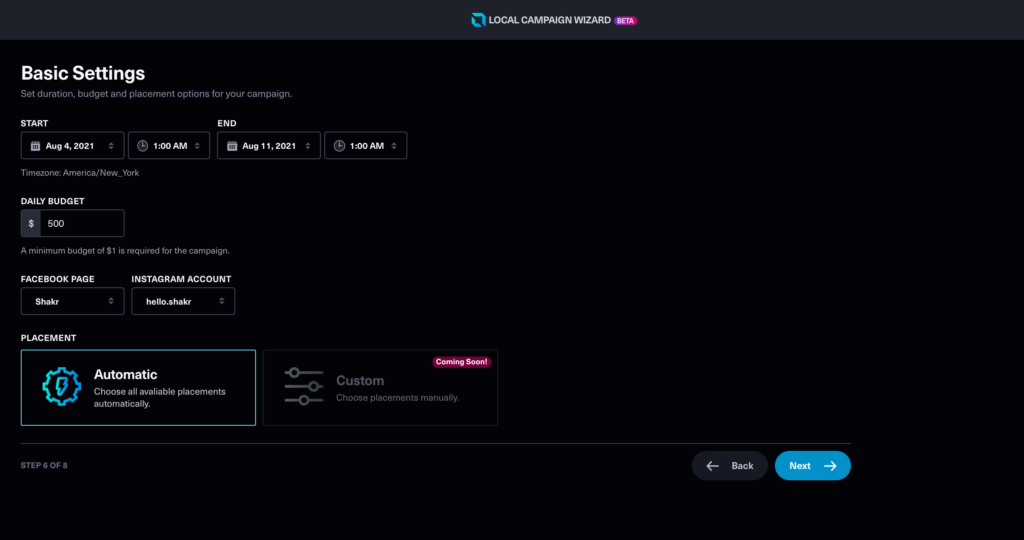
Step 6: Basic Settings
Assign basic settings for your campaign, that includes:
- Start to End Time & Date (The timezone is based on the one that you have set in your selected Facebook Ad Account. For example if your selected Ad Account is set as America/New York, then the campaign period will be set based on that timezone.
- Daily Budget
- Facebook Page & Instagram Account
- Placement: We currently only provide Automatic placement when launching campaigns via Shakr’s Local Campaign Wizard.
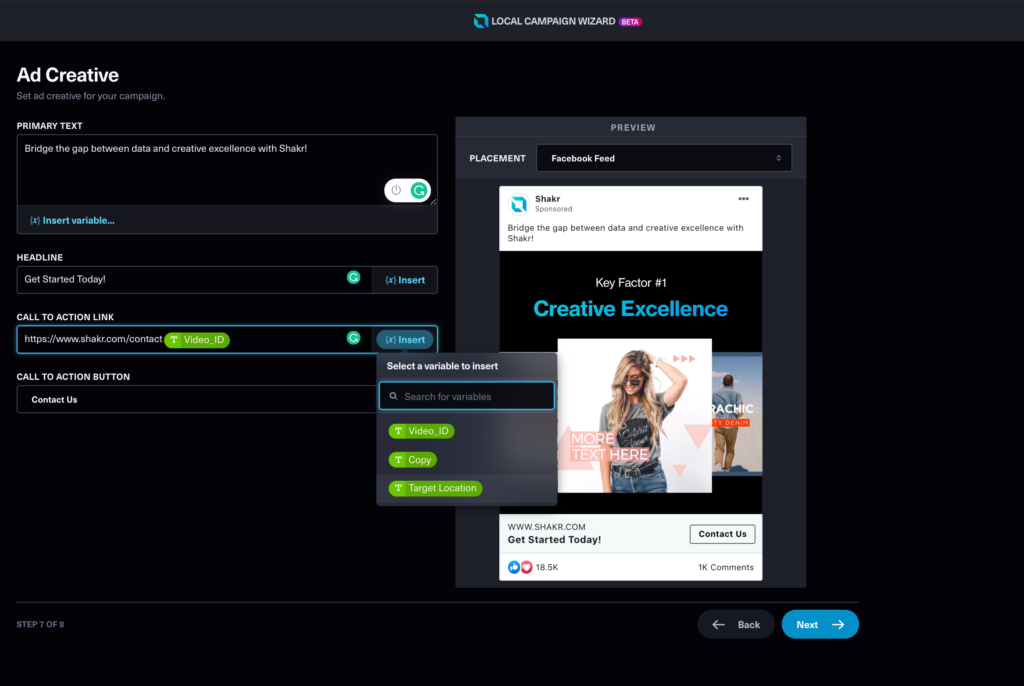
Step 7: Setting the Ad Creative
Now that we have the videos made, this step will ask you to insert information about how the actual Facebook or Instagram ads are to be shown. By putting in the information, you will also be able to preview how the ad would be portrayed at the right side of the screen. You can also insert a combination of static texts and variables from the data feed to structure the contents of the below aspects in the ad.
- Primary Text.
- Headline.
- Call to Action Link: Please make sure that the URLs start with
https://and the URL domain is the same for all links. - Call to Action Button.
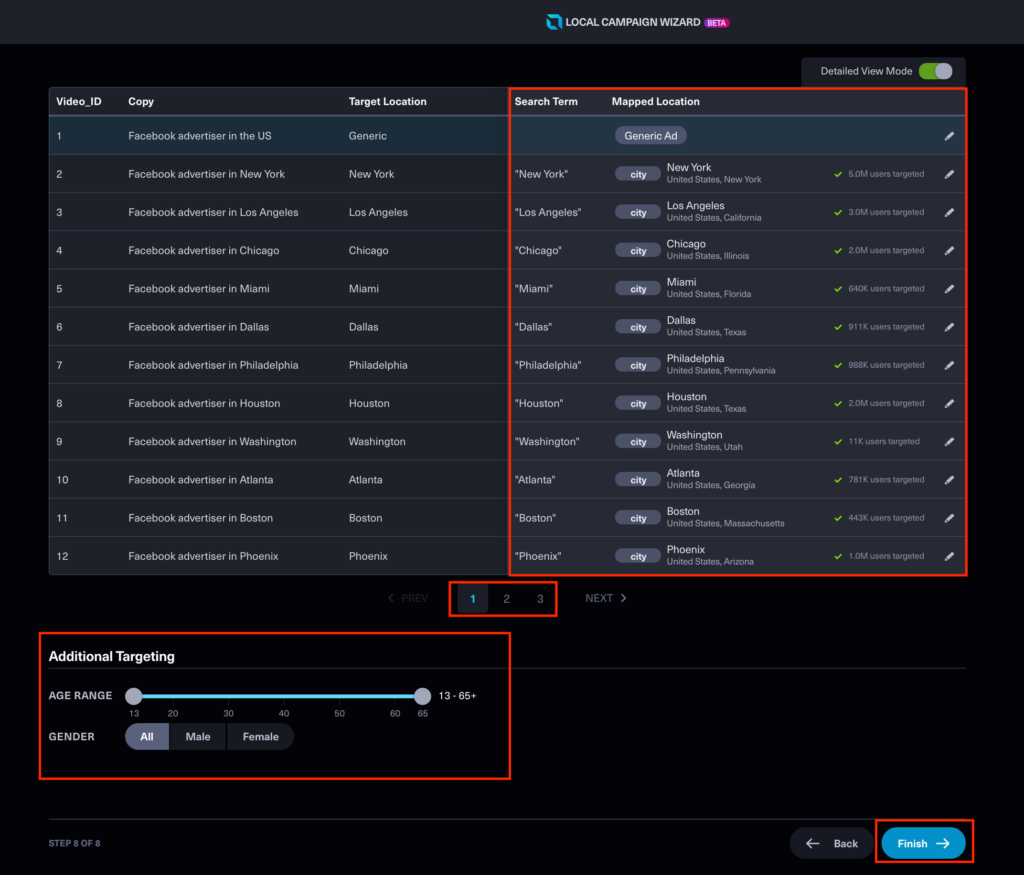
Step 8: Target Location Mapping
This can be said to be the final step of setting up your campaign. Here you will see the information that is contained in the data feed that you have uploaded. This step requires you to assign and set the actual locations for each row of the data feed (which also implies each localized creatives) and publish them as campaigns.
Before proceeding, we recommend that you have a look at this article to gain a better understanding of the maximum number of localized creatives that you can export per campaign through the Shakr Local Campaign Wizard.
In this step, there are mainly three things that need to be accomplished:
- Map locations for each rows.
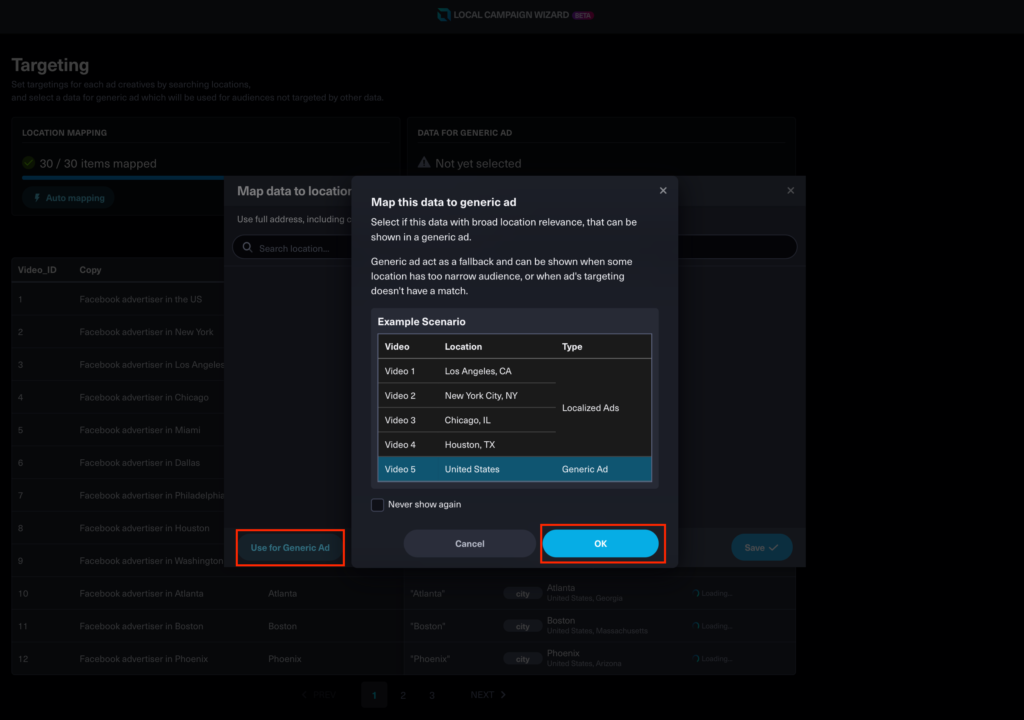
- Assign a row that will be used as a ‘Generic’ creative.
- Once all mapping is done, double check each rows to make sure that the locations for each rows are mapped correctly. If not, assign correct location for the wrongly mapped row.
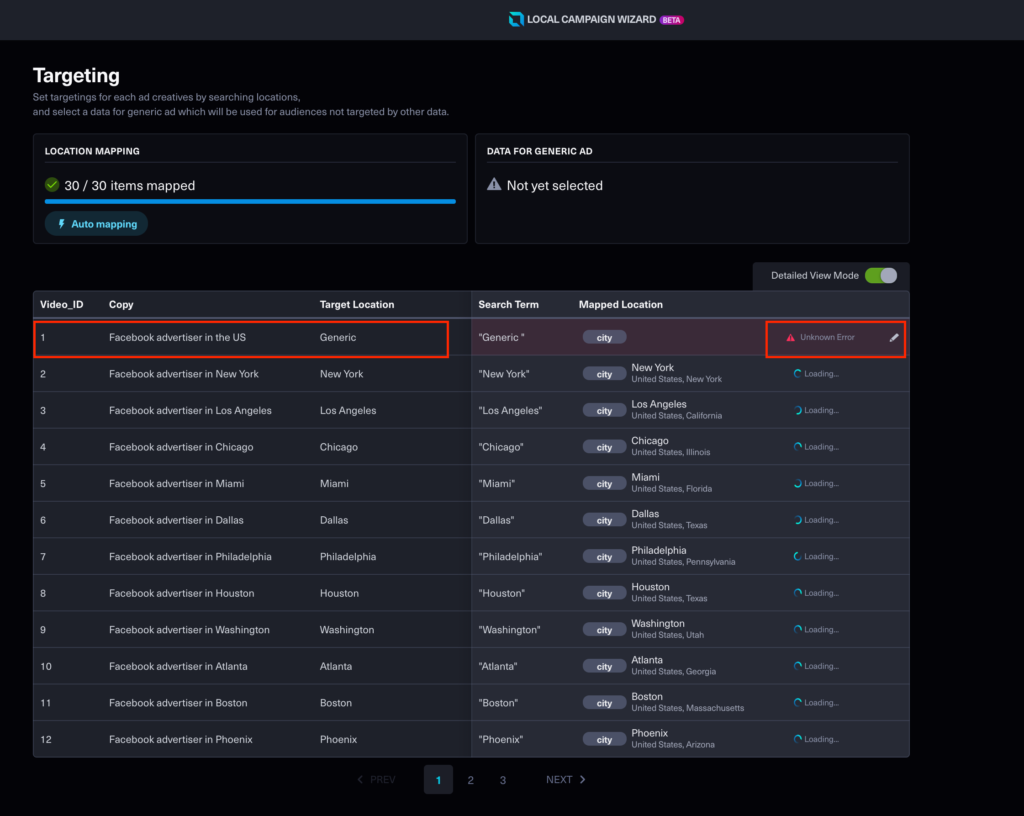
Having to map locations one by one can be a cumbersome job. So we have the convenient ‘auto-mapping’ feature that you can use to map target locations to each rows all at once… automatically!
Auto Location Mapping
Here is how the auto location mapping is done:
- Location Type: Select the type of location that is contained in the data feed (e.g. City, Sub-city, Regions, etc)
- Search Query: Select the variable (the column name) of the data feed that contains the location information.
- Specify Country (Optional): Limit the locations to be searched within the boundary of the specified country. This feature is recommended to use as it can derive much more accurate auto-mapping result.
Manual Location Mapping
You can also choose to map each location one by one by simply clicking on the ‘Set Targeting’ button for each row, search and save the location.
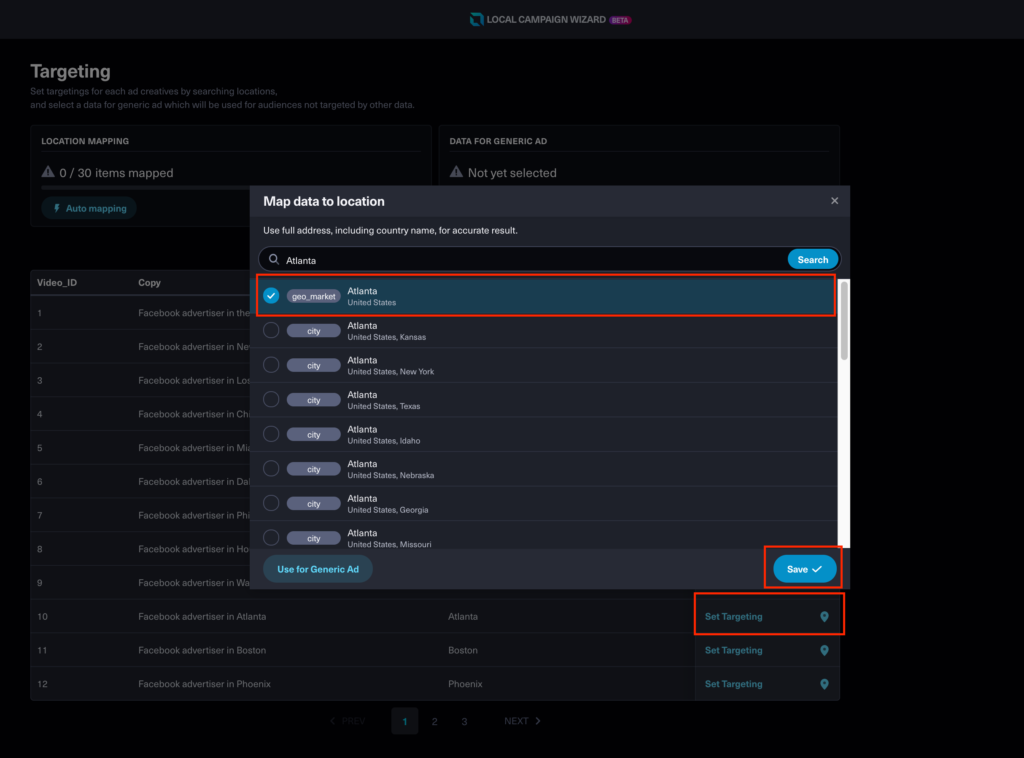
Generic Ad Creative
Your campaign should include one ‘Generic’ ad creative. A ‘Generic’ad creative is a creative to be shown when a mapped location(s) have too narrow audience or there is no match in the targeting location. The data feed you have uploaded in the previous step should have one row that is intended to be used as a Generic creative.
Additional Targeting
On top of locations, you can also set additional targeting for a more precise execution of your campaign. The additional targeting option includes:
- Age Range.
- Gender.
Please make sure to check that all rows in the data feed have correct locations assigned (check the city name, country, and the number of targeted users for your reference). The Wizard’ page shows up to 12 rows in the data feed so please don’t forget to check each page of the data feed.
Also, make sure to check that you have a row assigned as a ‘Generic Ad’ and the additional targeting options are also set as you desire.
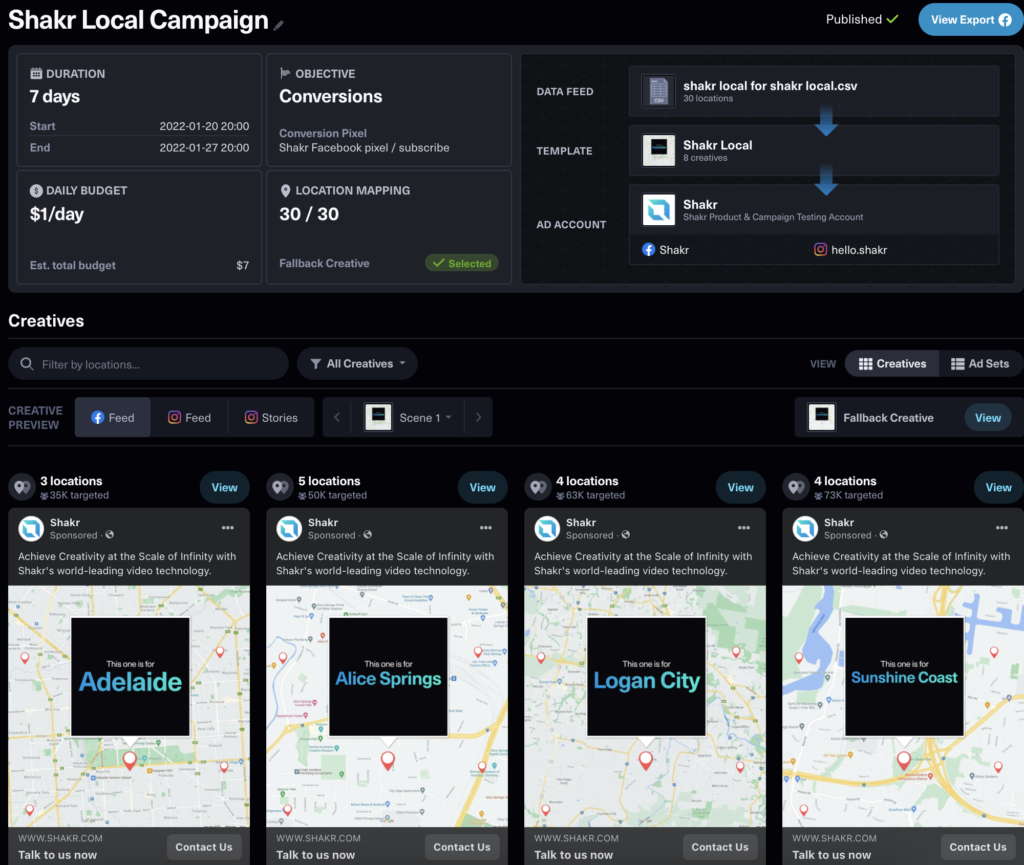
Final Step: Review the Published Campaign
By clicking on the ‘Finish’ button in the Local Campaign Wizard, your campaign export will be started. In the Campaign Summary Page, you can review:
- All campaign-setup information that you have assigned in each steps of the Local Campaign Wizard (Campaign duration, objective, daily budget, Ad Account, etc).
- All of the rendered video creative made in the Local Campaign Wizard. These videos will be shown once the video rendering and publishing is complete.
- On top of that, you can also check how many locations were assigned for each creatives, which is based on how you structured your data feed.
Please note that editing and re-publishing the campaign is currently not supported.
View Export
Once the publishing process is complete, you will then see the ‘View Export’ button at the top right corner of the summary page and moreover, the rendering of remaining localized creatives should all be completed.
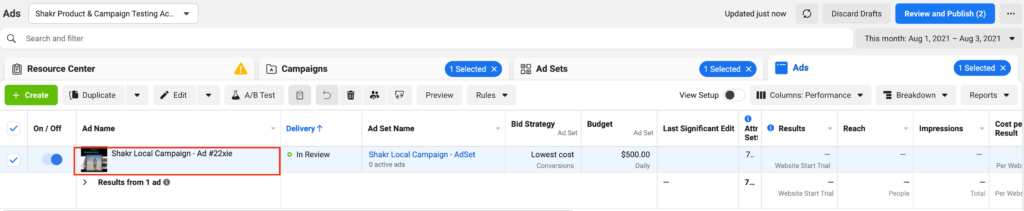
Clicking on the ‘View Export’ button will lead you to the ‘Campaigns’ page in the Facebook Ad Manager. In Facebook’s Ad Manager, you will be should be able to see that the campaign is well-published with the naming convention [Shakr Local] (Designated Campaign Name in the Local Campaign Wizard).
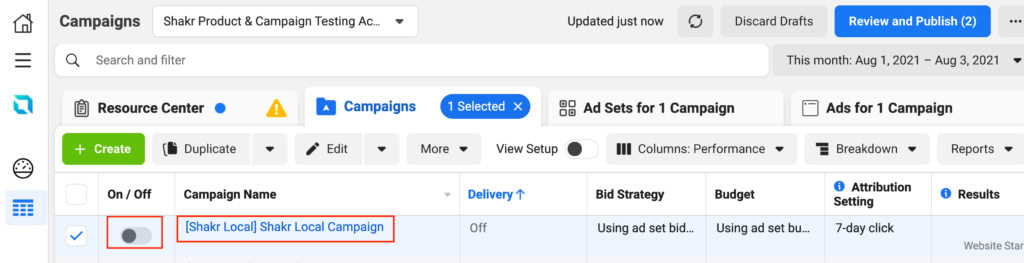
You can also ‘turn on’ (activate) the campaign here.
After Publishing the Campaign
The Shakr Local Campaign Wizard does not activate the campaign but helps you set and export the localized campaigns to Facebook, ready for your activation.
Once the campaign is exported, please be aware of the edits or changes that can/should not be made in your Facebook’s Ads Manager.
- Campaign Level: Edits/changes can be made like normal campaigns.
- Ad set level: Edits/changes can be made like normal ad set. However, if audience changes shrink the audience for a specific location below 1,000, the specific location will see the generic asset.
- Ad level: No changes should be made.
A campaign can be duplicated – for example, you can create an A/B test between two different campaigns with different audience targeting as long as the campaign objective remains the same.
Ad sets can also be duplicated. However, if audience changes shrink the audience for a specific location below 1000, the specific location will see the ‘Generic’ creative asset.
Please feel free to let us know if you have more questions or move to the below articles to learn more about our Shakr Dynamic Geo Ads solution: